June 5, 2010

Freezer paper stencil t-shirt

So I have seen TONS of tutorials on using freezer paper, so I had to see what it was all about. With my nephew's birthday coming I decided to use it as an opportunity to try it out.


My nephew, Brady, LOVES Lightning McQueen from "Cars" and has always called him Ka-Chow. So I thought I would use this as inspiration for his t-shirt.

So here is a brief tutorial on how I did it:
(click on pictures and they should get bigger)


Hopefully this tutorial will inspire you to try using FREEZER PAPER. I have already made another t-shirt for myself and have many other ideas brewing on how I can use this technique.

Few other tips:


post signature


May 27, 2010

My sock Monsters were featured on Tip Junkie with other great Kid Activities!


post signature

May 11, 2010

Fun Fabric Cards and Card Idea Roundup!

So I had some birthdays and of course Mothers day these past few weeks and I wanted to make some cards. I love this Paisley fabric I have so I wanted to incorporate it somehow. So I came up with the idea to do a cut-away and put the fabric underneath it.

Here are two that I made:


On both of them I just...
  • found a clip art or font that I liked and printed it out for my template (I used a cupcake and "m" for the ones above)
  • folded a piece of paper into 4ths to make the card (like a traditional card you would fold).
  • on the bottom right quadrant I traced my template and then used my cool Fiskars fingertip craft knife (a cooler version of a exacto-knife) to cut out the template area
  • taped my fabric (or felt- like in the cupcake one) on part that would be underneath the template.
  • I just glued down the top half to the bottom so the fabric is covered (and you don't see the tape)
  • embellished the card with some dashes and print!

Here are some other great card ideas I have found on other blogs!
(all pictures from respective links)

1. Stamp With Diane- Money Holding Card
2. Make and Takes- Hand Stitched Card
3. The How-to Gal- Flower Pop-up Card
4. Inchmark- Silhouette Card


Now take these ideas and get INSPIRED and create come cute cards!

post signature

April 22, 2010

Raspberry filled Cupcakes

So last night I needed to make a birthday treat to share with the young women group at my church that I am in charge of to celebrate one of the girls birthdays.

I have loads of great recipes I have found on blogs that I have been dying to try out! I decided on these delicious ones, Raspberry filled vanilla cupcakes, from Tidymom. They were sooooo wonderful, one of the girls even said they were the best cupcakes she has EVER had (I owe it to the great recipe, not my cooking skills).

Photo from Tidymom

There were no too overly difficult steps, just quite a few steps since you have to make the cupcakes, raspberry filling, and frosting. I guess you could cut back on a few of them if you used store bought frosting or even raspberry jam for the filling. However, I think the frosting and the filling are past of what makes them sooo delicious!

***Also, Tidymom does not follow the store bought cake mixes recipe, but uses the mix with her own recipe and I think this made the cupcakes HEAVENLY! I plan on following this next time I make ANY cupcakes! here is what she did:

1 box Duncan Hines Moist Deluxe French Vanilla

3 Large Eggs

1/2 cup butter, melted (use butter not margarine)

1 cup of water


Thanks Tidymom for the WONDERFUL recipe!!!!

post signature

April 20, 2010

WHOA NELLIE!

So I hve been a total blogging slacker.... would that make me a blacker or have I been slogging?

In between a lot of substitute teaching jobs, spring break, family visits, and so forth I am have not put much time into My Inspiration Index.

There are tons of GREAT ideas I want to post about and try... mean I'm talking like 737 starred items in my google reader that date all the way back to February....whoops!

I am going to try and put a little more effort in soon! For the time being here is one of my husbands favorite recipes that we just made again recently... Chicken South of the Boarder- or Chick Sob- for short.

4-5 chicken breasts pre cooked and hunked (boiled in broth, preserve some for later)
1 doz. Corn Tortillas cut into quarters
2 cans cream of chicken soup
1 sm. Can of Salsa Verde
1/2 Red pepper chopped finely
1/2 Green pepper chopped finely
1 c. onion chopped
2 Tbsp. butter
2-3 cloves garlic
2 c. of Cheddar and Monterey Jack cheese

In a medium saucepan saute peppers, onions, and garlic in butter. Be sure to cook until onions are golden brown and not crunchy. Add soup and salsa verde to vegetables. Simmer for 10 minutes stirring frequently.

In a glass baking dish, layer tortillas, drizzle broth, hunked chicken breasts, sauce, and then cheese. Do these layers twice.

Bake for 30 minutes at 350 uncovered.

post signature

March 18, 2010

My Dad's Delicious Buttermilk Cookies

So my dad used to give my mom "Sunday Dinners for a YEAR" for Christmas, meaning he would cook Sunday dinners for her. Not only did he cook, but he would go all out researching new recipes. His favorite recipes seemed to always come from little old ladies from the Midwest. It was soo cute to watch my dad do this each week and get so excited (i recommend this to all the husbands out there... it will win you bit points).

(picture of my Cute Mom and Dad)

Anyways... one of the recipes that is still repeated to this day at home is the Buttermilk cookies! My dad would always make them for me on special occasions or if I was home to visit. I have eaten my fair share of them... but FINALLY the other day I decided to make a batch.

So here is the yummy, delicious recipes (that I am sure was inspired by some old midwestern woman).


Ingredients:

  • 1/2 cup butter-softened
  • 1 cup sugar
  • 1 egg
  • 1 tsp. vanilla
  • 2 1/2 cups flour
  • 1/2 tsp. baking soda
  • 1/2 tsp. salt
  • 1/2 buttermilk
Directions:
  1. preheat oven to 375 degrees
  2. in a bowl, cream together the butter and sugar until fluffy and light
  3. beat in egg and vanilla
  4. mix in salt and baking soda
  5. mix in flour and buttermilk- alternating between the two to insure better mixing
  6. drop rounded tablespoons full of dough on to a greased cookie sheet about 2 inches apart (these cookies are not meant to look nice and perfect and round...so just slap the dough on there!)
  7. cook for 10-12 minutes-until outside edges are lightly browned
  8. remove and let cool on racks
Frosting
  • 3 TB. butter- softened
  • 3 1/2 cups powdered sugar
  • 1/4 milk
  • 1 tsp. vanilla
Just combine all ingredients together, beat until smooth, and then frost cookies.


These cookies are the BEST hot but are GREAT anytime!

post signature


FEATURED!

I have been FEATURED on Treasures for Tots for my Sock Monster Tutorial!

I feel so flattered... go here to check it out.


post signature


March 16, 2010

Mini Bunting Birthday Card VIDEO Tutorial.


So after breaking into the tutorial world with my first one... I realized they are pretty simple (as long as you plan ahead and think about it as you make the item). Well I was going to do a regular one but got lazy and didn't want to take a whole bunch of pictures of each step... in BAD lighting... so I pulled out my trusty FLIP camera and decided to give a VIDEO tutorial a whirl!

So first let me tell you where my inspiration came from... I stumbled upon this cute card on How about Orange a while ago... and it is my grandma's birthday tomorrow (yeah, she is a st. patty's girl!), so i had an opportunity to try it out!

So here is my tutorial... please pardon the shaky-ness, bad lighting, and overall AMATUER-ness of it all... but hopefully the things I am teaching come across.


BWS tips button


Let me know if you make one of these and if you found the tutorial helpful. Also I gladly welcome any constructive criticism so I can make the tutorials better!

post signature

March 13, 2010

3 of my favorite headband tutorials

There are HUNDREDS of tutorials and ideas out there in the blogosphere on headbands. I feel little girls of America are going to be the best accessorized on their head than ever before! I wish I had such cute options when I was a little girl! I will just make some for my GROWN-UP self now so I can feel cute too!

But here are three of my favorite tutorials!

Elastic Fabric Headbands from Paige and Brooke
I love this one because of its simplicity... no frills, just a straight headband. There are endless possibilities with all the different fabric you could use...
one for each outfit??...hehe!


Felt Bow Headband from Calico
This is a great way to take old, ugly headbands you have on hand and cover them to make them SNAZZY! I love all the examples of easy things you can do to them!

Felt Peony Flower on Headband from Yoonie-at-Home
I espeically like the flower template on this post... it can be used for SOOOO many things, not just headbands. I actually have used these tutorial A LOT already! I have made multiple Baby headbands from it...just put the peony on a nylon headband versus the plastic one she uses.
(see pictures below)


I hope you love these tutorials too! If you have other great ones... please let me know! Also, if you have used these tutorials I would love to know how they worked for you.

Happy Hair!


post signature

Felt Monogrammed Key Chain Tutorial

The other day I was in Forever 21 shopping and near the register was this odd looking key chain.

Now I was in NO way intending to buy this bizarre item...but it got me thinking. I thought that I could use my felt and embroidery thread at home to make a similar thing. I do not want a alien bunny on my key chain, but I have always been drawn to monogrammed ones... so I came up with this idea!


All you need are some Felt (can just be scraps), embroidery thread, and sewing supplies (needle, pins, scissors, etc). After that you just need a plan for you key chain!
These are super simple... just:
  1. Cut out felt pieces. Make sure to have a front and back piece so you can be able to stuff it with batting for more volume.
  2. Stitch on monogram. I used a back stitch to create a straight line of thread, however you could just do a basic stitch (like I used on the outside of key chain- in white). I also at this point cut out a small strip of felt and created a loop with it and just discreetly sewed it on to one of the background pieces.
  3. Stitch two pieces of background felt together. Before finishing up outline, stuff with just a small amount of batting. (If you don't have batting, just use a cotton ball that you pull apart). With the end of the thread I just use a pen or scissors to tuck it inside the two pieces to hide it.

And TA-DA.... you have a new personalized key chain... no more silly rubber GIECO one!

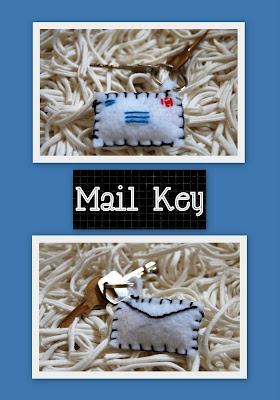
You can continue to be creative with just small scraps of felt. I decided to make a LETTER one to go on our mail key. Let you CREATIVITY flow and have fun!

post signature